Commercial locksmith
Panic Bar Installation for Wichita Businesses: A Practical Planning Guide
A panic bar looks simple because a person can press one horizontal surface and move toward the exit. The installed opening is more complex. The device, door, frame, strike, closer, exterior trim, fire label, access-control components, and surrounding exit path must work as a coordinated system. For a Wichita business, good planning starts by defining the door's required function and actual condition before anyone selects a product or drills the first mounting hole.
Begin with an opening-by-opening assessment. Confirm how the door is used, who controls exterior entry, whether the assembly is fire-rated, what hardware is already installed, and whether the door closes and latches reliably. Then select a compatible listed device and any exterior trim or access-control components, compare itemized scopes, schedule the work around operations, and test exit, closing, latching, locking, and reentry before accepting the installation.
A panic bar looks simple because a person can press one horizontal surface and move toward the exit. The installed opening is more complex. The device, door, frame, strike, closer, exterior trim, fire label, access-control components, and surrounding exit path must work as a coordinated system. For a Wichita business, good planning starts by defining the door's required function and actual condition before anyone selects a product or drills the first mounting hole. Continue with the complete library of commercial locksmith guides when you want to compare related decisions.
Key takeaways
- A panic bar is one part of a complete opening, not a cure for a sagging door, damaged frame, or failing closer.
- Rim, mortise, and vertical-rod devices solve different door and latch conditions and should not be treated as interchangeable.
- Exterior entry can be controlled while interior egress remains available, but every connected component must be compatible.
- Fire labels, occupancy, accessibility, and local project requirements should be reviewed by the responsible authority before hardware is ordered.
- Final acceptance should test the opening under normal operating conditions and leave clear product, key, credential, and maintenance records.
Start with the exit function, not the device catalog
The first question is what the opening must do during an ordinary day and during an emergency. Some doors serve only as exits, while others also receive employees, deliveries, customers, or tenants from the exterior. Some are paired doors, some are narrow-stile storefront assemblies, and some belong to a fire-rated opening with limits on what may be altered. If this condition matches your situation, review the service scope for panic bar installation.
Describe the operating result in plain language. The business may need free interior exit with key-controlled exterior entry, a device that sounds a local alarm, compatible electronic entry for staff, dependable latching after every use, or replacement of an existing bar that no longer works smoothly. That result is more useful than asking for a generic 'push bar,' because not every horizontal bar is the same type of listed exit hardware.
Name the people who can approve the work. A tenant, property manager, owner, facilities team, fire-safety professional, architect, and authority having jurisdiction may control different parts of the decision. Resolving ownership and project requirements early prevents a field technician from being asked to redesign an occupied exit after hardware has already arrived.
How must people leave?
Define the inside operation, travel direction, traffic pattern, and any emergency or alarm behavior.
Who may enter from outside?
Identify key, lever, pull, keypad, card, mobile credential, or exit-only requirements.
Who approves the opening?
Confirm tenant, owner, property, design, and local review responsibilities before ordering.
Build an opening inventory before requesting a price
Give each affected door a stable identifier such as Sales-Exit-01, Rear-Exit-02, or Warehouse-East-03. Record location, door and frame material, width, swing, single or paired configuration, traffic, current device, latch arrangement, exterior trim, closer, alarm, access control, visible labels, and known problems. Wide photographs can support the record, but they do not replace measurements or an on-site inspection. If this condition matches your situation, review the service scope for commercial locksmith services.
Observe the door through a complete cycle. It should open without unusual force, move through its intended path, close under the closer's control, align with the strike, latch positively, and remain secured from the exterior as designed. A device that works while the door is propped open may fail when frame pressure, weather seals, building air pressure, or door sag affects the latch.
Include the area around the opening. Merchandise, furniture, floor mats, delivery carts, temporary displays, and stored materials can change how people approach and use a door. The hardware project should not be used to excuse an obstructed path, and the site team should identify operational conditions that must remain clear after installation.
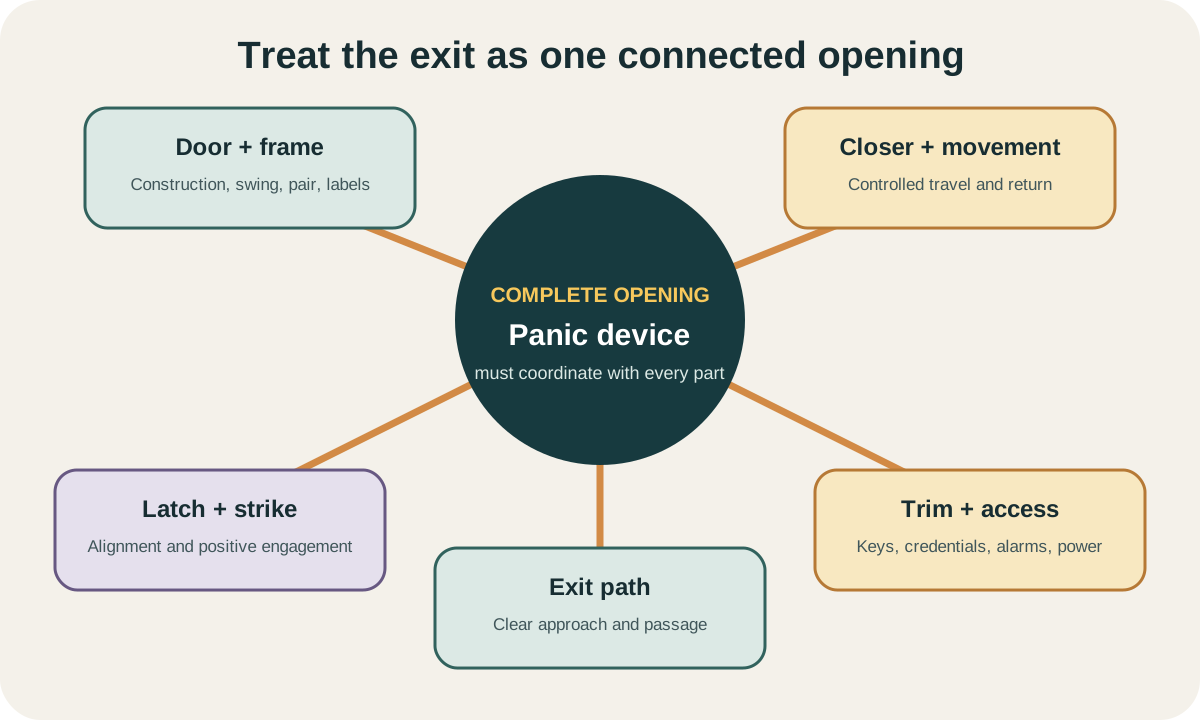
| Inventory field | What to capture | Why it affects the scope |
|---|---|---|
| Door identity | Stable ID, location, use, and responsible party | Connects the estimate, installation, tests, and future service |
| Construction | Metal, wood, aluminum, glass, single, pair, width, and swing | Changes device type, mounting, reinforcement, and preparation |
| Existing hardware | Latch, strike, closer, hinges or pivots, trim, alarm, and access control | Reveals compatibility and connected work |
| Condition | Binding, sag, loose parts, impact, corrosion, and failed latching | Separates device replacement from door or frame correction |
| Operating needs | Exit, exterior entry, schedules, credentials, and monitoring | Defines the required function rather than just the visible bar |
Confirm the project requirements for the specific opening
Exit hardware decisions depend on the building, occupancy, occupant load, door location, fire rating, local adopted codes, and the full project context. A business owner should not try to determine the required device from a product photo or a rule summarized online. Have the responsible design professional, property team, or local authority confirm what applies to the opening when the project involves a new use, renovation, fire-rated assembly, or uncertain requirement. If this condition matches your situation, review the service scope for storefront door lock service.
The federal exit-route requirements (opens in a new tab) state that employees must be able to open an exit-route door from the inside without keys, tools, or special knowledge, and they specifically recognize a panic bar that locks only from the outside on an exit discharge door. That federal workplace rule is one useful reference, but it is not a substitute for the adopted building and fire requirements governing the specific Wichita property. The installation scope should identify who verifies those requirements.
Treat visible labels and existing rated components as important evidence. Do not paint over, remove, drill through, or modify a label or rated assembly casually. If the door, frame, glass, device, closer, coordinator, or other component is part of a listed system, product selection and field preparation may require specific compatible hardware and approved procedures.
Match the device family to the door and latch arrangement
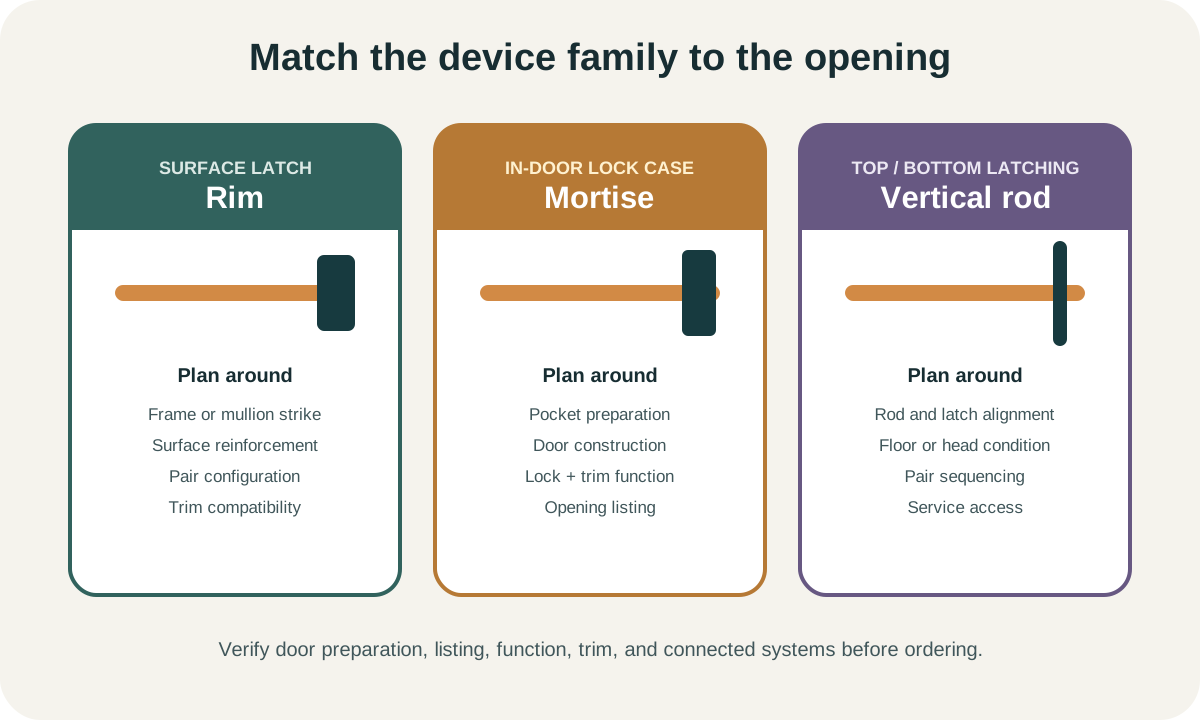
A rim exit device mounts on the face of the door and latches at a surface-mounted strike on the frame or mullion. It is common because the operating and latching components remain comparatively accessible, but the opening still needs suitable construction, clear mounting space, reinforcement, and correct alignment. Paired doors may require a mullion or a different coordinated arrangement depending on how both leaves are intended to operate.
A mortise exit device operates a mortise lock case installed within the door edge. It can suit doors already prepared for that system, but it requires accurate door preparation and compatible components. Replacing a mortise device with a rim device, or the reverse, may leave openings, create reinforcement needs, change the strike condition, and affect the appearance or listing of the assembly.
Vertical-rod devices latch at the top, bottom, or both locations and are often used on pairs or openings where a conventional strike arrangement is not available. Rod alignment, floor or threshold conditions, door movement, coordinators, and concealed components can make service more involved. The estimate should state the exact device family and why it matches the existing or planned opening.
| Device family | Basic latch arrangement | Planning focus |
|---|---|---|
| Rim | Surface latch at frame or removable mullion | Strike support, door face preparation, pair configuration, and alignment |
| Mortise | Lock case housed in the door edge | Accurate pocket preparation, compatible trim, door construction, and listing |
| Surface vertical rod | Visible rods connect device to top or bottom latches | Rod path, latch alignment, floor condition, protection, and maintenance |
| Concealed vertical rod | Rods and latches concealed in the door | Factory preparation, access for service, pair sequencing, and exact compatibility |
Separate device problems from door and frame problems
A sticking bar does not always mean the bar is the only failed component. Door sag can pull the latch away from the strike, a loose frame can change alignment, a damaged hinge or pivot can lower the leaf, and a closer can prevent the door from reaching the latch position. Replacing the visible device without correcting those conditions can produce a new installation that immediately feels unreliable.
Inspect for rubbing at the head or threshold, loose fasteners, cracked or enlarged mounting holes, damaged door skins, missing reinforcement, bent strikes, worn pivots, failed closers, improper hold-open behavior, and evidence of repeated slamming or impact. Record which trade owns each repair. A locksmith may handle compatible hardware and alignment work, while damaged doors, frames, glazing, masonry, electrical wiring, or rated construction may require other qualified parties.
Do not compensate for a failing opening by setting a latch so loosely that it no longer secures, disabling a closer, taping a latch, or propping the door. Those workarounds can conceal the symptom while undermining the reason the door exists. A complete scope restores controlled movement, reliable latching, required exit operation, and the intended exterior security together.
- Does the door move freely through its full swing?
- Does the closer return it to a consistent latch position?
- Are hinges, pivots, fasteners, frame, and mounting surfaces stable?
- Does the latch meet the strike without lifting, pulling, or slamming the door?
- Are rated labels, glazing, seals, and connected components intact?
- Can every repair responsibility be assigned before installation day?
Plan exterior trim without compromising interior exit
Many panic-bar doors also need controlled entry from outside. Compatible trim may provide a keyed cylinder, lever, pull, or another operating function while the interior device continues to release the latch. The exact trim must match the exit-device model, door thickness, handing, function, finish, and keying plan rather than being selected as a separate accessory.
Decide what happens when the outside trim is locked, unlocked, or set to a passage condition. A manager may need scheduled daytime entry, key access for opening staff, an exit-only condition after closing, or a way to maintain authorized reentry after an alarm. Document the desired state and who can change it so daily operations do not depend on an unlabeled key or an informal instruction.
Coordinate cylinders and keys with the commercial key system when appropriate, but avoid giving broad master access to people who only need one entrance. If the business uses a restricted keyway or landlord-controlled system, confirm authorization and compatible parts before ordering. The closeout should show which exterior keys or credentials operate each door and who holds them.
No routine exterior operation
Use the opening for egress while keeping exterior entry unavailable except for an approved override, if provided.
Mechanical exterior control
Coordinate cylinder, trim function, keyway, and key authority with the device and business key plan.
Electronic credential control
Coordinate the reader, electrified hardware, power, release logic, and administration without restricting exit.
Coordinate accessibility with closing and latching
The U.S. Access Board guidance for entrances, doors, and gates (opens in a new tab) explains requirements and recommendations involving clear width, maneuvering clearance, thresholds, hardware, closing speed, and opening force.
It also addresses panic bars in the context of latch-side maneuvering clearance. Use that guidance as a planning reference while having the project team determine the exact requirements for the property and opening.
The panic device should present a clear operating surface and move without binding, but it is not the only factor affecting usability. A powerful closer, pressure difference, rough threshold, narrow clear opening, obstructed approach, or poorly positioned exterior hardware can make passage difficult. Evaluate the complete path and both sides that people are expected to use.
Adjustment requires balance. The door must be manageable for users while still closing and latching consistently under ordinary conditions. Reducing closer force without considering wind, seals, air pressure, fire-door needs, and latch engagement can leave the opening unsecured or unable to perform its required function.
Integrate alarms and access control as one coordinated system
A local exit alarm may discourage unauthorized use or notify staff when a door opens, but it should not create a physical restriction on required egress. The plan should define arming, disarming, reset, battery or power needs, authorized keys or credentials, sound level expectations, and the person responsible for responding. Staff training matters because a device that sounds unexpectedly is often defeated instead of administered.
Electronic exterior entry may use electrified trim, latch retraction, an electric strike in suitable conditions, or another compatible method. The access-control designer and hardware technician should coordinate device model, power supply, wire transfer, request-to-exit signal, door position monitoring, fire-alarm interface where applicable, mechanical override, failure mode, and commissioning. A reader alone does not define how the opening behaves when power or network service changes.
Keep interior release intuitive. Do not add a lock, sensor, delayed action, or secondary device based on an online diagram without project-specific review. The written sequence should describe normal entry, normal exit, after-hours conditions, power loss, alarm conditions, manual override, and administrator responsibility so every trade is working toward the same result.
| Component | Question to answer | Acceptance evidence |
|---|---|---|
| Exterior reader or keypad | Who may enter, when, and with which credential? | Approved users and schedules operate the correct door |
| Electrified hardware | How is entry released while exit remains available? | Normal, denied, and approved entry states work as documented |
| Alarm | Who arms, resets, responds, and maintains it? | Authorized operation and alert behavior are demonstrated |
| Door monitoring | Which open, forced, or held conditions are reported? | Events appear where administrators expect them |
| Power or network loss | What state should each component enter? | Failure behavior matches the approved sequence |
Compare complete estimates instead of bar-only prices
Ask each proposal to identify the door ID, observed condition, device manufacturer and series or equivalent specification, device family, trim, cylinder or credential function, strike, closer work, reinforcement, finish, access-control or alarm coordination, removal, patching, labor, scheduling, testing, warranty, and exclusions. A single line reading 'install panic bar' does not reveal whether proposals describe the same result.
Separate existing-condition repairs from the new hardware. Door adjustment, hinge or pivot work, closer replacement, frame repair, wiring, fire-alarm work, painting, glazing, patching, and permitting may not belong to the same contractor. The estimate should name the responsible party and sequence so the final installer is not waiting beside a door that is still out of alignment or lacks required power.
Clarify substitutions and hidden conditions before work begins. If reinforcement is missing, the door is more damaged than expected, the device cannot be matched, or a visible label changes the permitted preparation, the technician should document the condition and obtain approval for a revised scope. A controlled change process protects the opening better than forcing the original hardware onto an incompatible condition.
- Door ID and verified opening condition
- Exact device family, function, trim, finish, strike, and compatible accessories
- Cylinder, keying, credential, alarm, and access-control responsibilities
- Door, frame, closer, reinforcement, electrical, patching, and finish work
- Removal, disposal, service window, temporary control, and business interruption
- Commissioning tests, documentation, warranty, maintenance, and exclusions
Schedule installation around people, traffic, and security
An occupied exit cannot be treated like an unused workshop door. Plan the service window around customers, employees, deliveries, tenant movement, alarms, opening and closing routines, and any period when the door will be unavailable. Establish an alternate authorized route and communicate it through the responsible property or safety team without obscuring or blocking required paths.
Protect the opening while old hardware is removed and new preparation is completed. A technician may need stable access on both sides, a clean work area, electrical coordination, and time for repeated adjustment. Do not rush acceptance simply because the business is ready to close or reopen; latching and exit operation should be verified under the actual pressure, closer, and traffic conditions the door will experience.
Assign control of keys, cylinders, alarm keys, credentials, programming records, and temporary measures during the transition. If the door cannot be completed in one visit because a part or another trade is required, document the interim condition, responsible person, safe operating plan, and completion date. Temporary should mean controlled and time-limited, not an improvised permanent workaround.
Prepare route and authority
Confirm the service window, alternate movement, approver, connected systems, and responsible trades.
Control the opening
Keep the work area clear, protect the property, and track keys, credentials, alarms, and temporary conditions.
Test under normal conditions
Restore traffic only after release, closing, latching, locking, entry, and connected functions are verified.
Accept the installation with repeatable tests and useful records
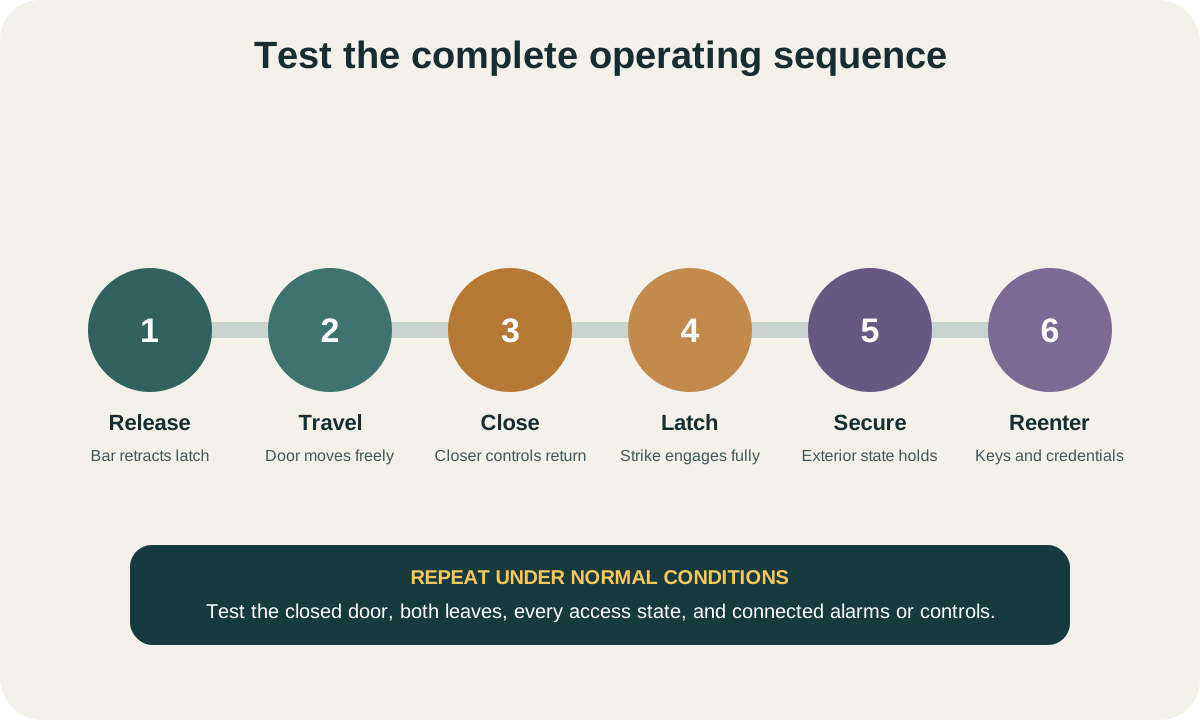
Operate the device from several points along the touchpad or bar using normal pressure. Confirm the latch releases, the door opens through its intended path, the device returns, the closer controls the swing, and the latch engages without pulling, lifting, or slamming. Repeat the cycle enough times to reveal intermittent binding and test both leaves and any coordinator or mullion condition on a pair.
Test the exterior function in every promised state. Verify keys, levers, pulls, alarms, readers, credentials, request-to-exit signals, door contacts, schedules, and mechanical overrides as applicable. Demonstrate power or communication loss behavior when the approved commissioning plan calls for it, and confirm that no connected feature prevents the intended interior release.
Keep the approved estimate, door schedule, product model, key and cylinder record, credential administration details, wiring or sequence documents, warranty, test results, training notes, and open items. Record who owns routine inspection, battery or power-supply maintenance, credential changes, closer adjustment, and repair calls. Useful closeout makes the next service event faster and keeps staff from solving a hardware problem with tape, props, or guesswork.
When to call Heartland about panic bar installation in Wichita
Call when a Wichita business is adding exit hardware, replacing an unreliable device, changing exterior entry, coordinating a reader or alarm, or updating an opening during renovation. Request prompt assessment when the bar sticks, the latch does not retract, the door will not close, the device is loose, the trim fails, or staff have begun propping the opening because normal operation is unreliable. Use emergency services first for an active fire, medical event, crime in progress, or immediate threat.
Before the visit, gather the business address and suite, authorization contact, door IDs, operating hours, symptoms, existing keys or credentials, visible product information, alarm or access-control details, and property requirements. Share wide photographs when safe, but avoid sending key cuts, codes, protected wiring diagrams, alarm instructions, or sensitive access records through ordinary messages. Note any visible fire labels without altering them.
Heartland can inspect the complete opening, explain device and trim options, identify connected repair needs, and document a practical scope. Start with our panic bar installation service, broader commercial locksmith services, or storefront door lock service when an aluminum entrance has narrow-stile hardware or alignment problems. The goal is a door that people can use intuitively from inside and that the business can secure, administer, test, and maintain from day to day.
Frequently asked questions
Questions readers ask
Is every horizontal push bar a panic bar?
No. A horizontal bar may be a simple push or latch device, while listed panic hardware and fire-exit hardware are designed and tested for particular applications. The project team should identify the opening requirements and product listing before selecting a replacement based only on appearance.
Can a panic-bar door stay locked from the outside?
Compatible exterior trim can control entry while the interior device continues to release the latch. The correct function depends on the exit device, cylinder or credential plan, door, occupancy, and project requirements. Test both exterior security and interior release at handoff.
Can access control work with a panic bar?
Yes, when compatible electrified trim, latch retraction, or another approved arrangement is designed with the device, power, controls, request-to-exit function, monitoring, and failure behavior. The electronic system must not be treated as a separate add-on to the exit opening.
Why does a new exit device still fail to latch?
The door may be sagging, the frame or strike may be misaligned, the closer may not bring the door fully closed, the opening may be under pressure, or mounting and adjustment may be incorrect. Inspect the complete opening instead of repeatedly adjusting only the visible bar.
What should a Wichita business receive after installation?
Request the final door schedule, installed product information, keys or credentials with counted custody, administration instructions, warranty, test results, training notes, and a list of any remaining door, frame, electrical, alarm, or access-control work assigned to another party.
The right solution depends on the specific lock, door, vehicle or garage door system. Check the Wichita-area service pages, then call or send the details for an evaluation.